By: Simon Brooke :: 30 October 2004
This week I have been mostly making a longbow. Yes, that's the one I made, in the picture. What? Show-off? Moi?
At this time of year, for the past several years, we (where for these purposes 'we' is Southwest Community Woodlands Trust) have put on courses on making this or that out of the products of the forest, and this autumn one of the things we'd decided to make was longbows. And as soon as the idea was mooted I thought I definitely wanted to give that a go. In the way of things, somebody knew a bowyer, a man called Dave Cotterill, who turned out to be a gentle, competent man and a most excellent teacher.
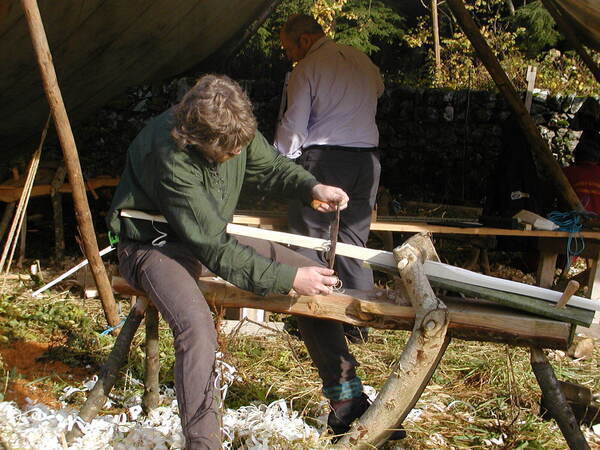
We started with an ash pole of about eight inches diameter which had been cleft into four and left to season for three months (a year would have been better). We also had some sawn staves which were better seasoned, but all but one of us chose to use the cleft. So each bow was made out of a quarter section of log. The bark was stripped to expose the cambium. A centre line was then marked on the cambium, and the front elevation of the bow maked out from this. The bows were made to the measurements of the maker, so no two were intended to be exactly alike.
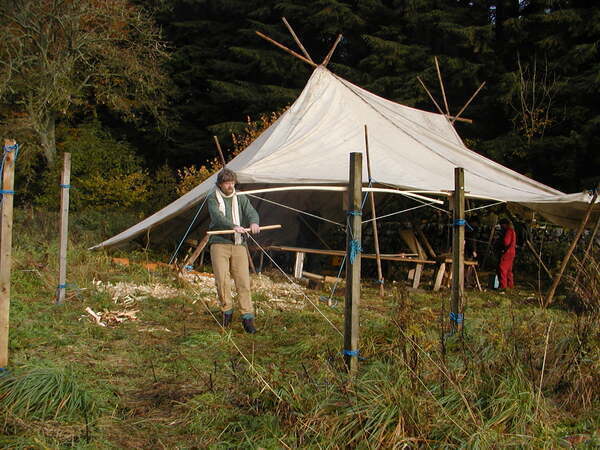
Obviously with such large section staves there was a lot of waste to remove. Had we been doing this modern fashion we would have used a bandsaw, but we didn't have electricity (I should say that we were working, as usual, under canvas in the meadow at Taliesin amid the most glorious show of autumn colour), so we used sideaxes, billhooks and hatchets for initial rough shaping, and then draw knives for the next stage of shaping. I even removed a fair bit of waste from my stave with a froe, which took a bit of courage!
As we removed waste the staves started to curve outwards naturally like sections of a stick of celery. It was extremely rewarding working with these cloven staves of straight grained timber — all the grain problems you get with sawn timber simply did not arise. It was beatiful to cut and work. The waste was all removed from the heart of the log, working from the side that would become the belly of the bow; the cambium layer which would become the back of the bow was left untouched. During this shaping the handle section of the bow was made square, the rest roughly shaped into the D section curve it would eventually have — although we intentionally left the bows a little herculean.
Once we had something which looked roughly like a bow, we cut nocks in the ends and made our bowstrings. Now I had thought in my ignorance that a bowstring was just a piece of cord. Not so; the construction is intricate. The string was made up of twelve lengths of waxed terylene cord. These were laid together simply by hand twisting (definitely a knack to this) for the top few inches, and the eye formed using a splicing technique I had never seen before. Then the main length of the string was simply loosely twisted, but the bottom ten or so inches were again hand twisted into a cable. The strings were later served around the section where the arrow nock sits. The spliced eye was then slipped into the upper nock, and tail of the string secured to the lower nock with a timber hitch - a neat form of slip knot.
With the strings made we were ready to 'tiller' or 'train' the bows. The tillers were posts about six feet tall, with a notch near the top in which the handle of the bow sat. A rope through a pully at the foot of the post was then hooked onto the string, and pulled to begin bending the bow.
The object of the next stage of the exercise was two fold: to progressively shape the bow to achieve a strong, even curve, essentially by removing material from where the bow was too strong; and to get the stave used to bending. We were told (and I'll believe) that if you drew a new stave back to full draw first go without initially drawing it first to gentler curves and then progressively deeper curves it would be likely to break, whereas if it was progressively drawn over a fair number of cycles to deeper and deeper curves it would accept them.
In shaping, we'd sit the bow on a tiller, pull it (at first all fairly gingerly), note sections which weren't bending smoothly, take it back to the shave horse, shave a little off, and then back to the tiller to try again. I early learned that it is easy to be too enthusiastic in the 'shaving a little off' stage — I turned a strong spot on the lower limb of my bow into a weak point, and spent the next several hours carefully correcting this, and almost certainly ended up with a weaker bow in consequence.
In this final shaping process the one bow which had been made from a sawn stave — fortunately not mine — developed a crack, precisely where the saw cut had cut through a grain line, allowing the grain to lift. This was the only disappointment of the course, and I felt intensely sorry for the woman whose bow cracked.
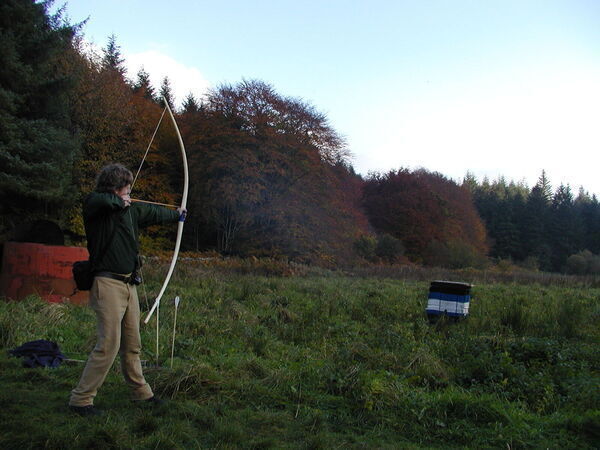
However, remarkably quickly, the rest of us had usable bows and the first arrows were being shot. My bow ended up with a draw weight of about 37 pounds — not, frankly, as much as I'd hoped, but it certainly makes it easy for an inexperienced archer to draw. And it shot remarkably well. Initially I was putting arrows a little above and to the left of where I wanted them, but with a little practice I was hitting close to the centre of the target with every shot. Very satisfying.
It isn't the best bow in the world. Being made of fairly green timber, it has already developed quite a lot of 'string follow' — that is, it retains much of its curve even when unstrung. This is undesirable — it weakens the bow. The finish is a little rough (although I can probably improve tht with the judicious application of fine sandpaper). And the upper limb is a little weaker than the lower, so it could do with more tillering and adjustment yet. But it is still a thing of beauty and it works remarkably well. And one of these days I may make another, which will be better.